Until now, you were not able to over allocate RAM to virtual machines running Hyper-V. You could allocate enough static RAM to a set of VMs that would exceed the total amount of RAM on the server, but you would not be able to start all your virtual machines.
Part of server consolidation is the ability to take servers that are underutilized and move their operations to a single server. This has worked well however, even when a virtual machine was not taxed to its maximum memory load, it still consumed the same amount of memory and therefor was a hindrance to further consolidation.
Dynamic memory allows you to safely increase the VM density on a server. This feature requires Windows Server 2008 R2 SP1 and is available on the following guest partitions:
After installing Windows Server 2008 R2 SP1, I ran a test of the dynamic memory option. Dynamic memory is not enabled by default. The screen shot below shows the memory page of a VM on the upgraded server.

Two new areas have been added, Dynamic and the Memory weight.
In the Dynamic Memory area, you must first decide on the minimal amount of RAM that is required to start the VM. The Maximum RAM setting is the upper limit of RAM that you will allocate to this VM. You cannot use this option to assign more RAM than is physically on the server. 64GB is still the upper limit for a virtual machine.
The Memory Buffer allows you to specify additional RAM above the current workload requirements. If it is available, your VM will have additional RAM to work with
The Memory Weight option allows you to establish a pecking order among your VMs to decide who gets additional RAM when the free pool of RAM is depleted.
The Memory Weight and Memory Buffer are the only two memory settings that can be adjusted while a VM is running. Changing between static and dynamic or adjusting dynamic memory requires the VM to be shut down.
The Hyper-V Manager also has some new columns added to it:
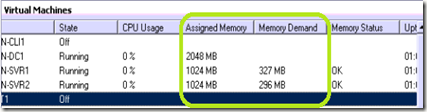
The Assigned Memory always starts at the Startup RAM value. The Memory Demand lets you know how much RAM is actually being used. The VM that is not reporting Memory Demand is configured for static memory.
You also need to install SP1 on your VMs to take fully advantage of Dynamic memory. Re-installing the integration services will also provide this functionality, but Microsoft recommends that you upgrade all VMs to SP1.
More information can be found by following this link to Microsoft.
Part of server consolidation is the ability to take servers that are underutilized and move their operations to a single server. This has worked well however, even when a virtual machine was not taxed to its maximum memory load, it still consumed the same amount of memory and therefor was a hindrance to further consolidation.
Dynamic memory allows you to safely increase the VM density on a server. This feature requires Windows Server 2008 R2 SP1 and is available on the following guest partitions:
- Windows Server 2003 Enterprise and Datacenter with SP2 (32 and 64-bit versions)
- Windows Server 2003 R2 Enterprise and Datacenter with SP2 (32 and 64-bit versions)
- Windows Server 2008 Enterprise and Datacenter (32 and 64-bit versions)
- Windows Server 2008 R2 Enterprise and Datacenter (32 and 64-bit versions)
- Windows Vista Ultimate and Enterprise with SP1 (32 and 64-bit versions)
- Windows 7 Ultimate and Enterprise (32 and 64-bit versions)
After installing Windows Server 2008 R2 SP1, I ran a test of the dynamic memory option. Dynamic memory is not enabled by default. The screen shot below shows the memory page of a VM on the upgraded server.

Two new areas have been added, Dynamic and the Memory weight.
In the Dynamic Memory area, you must first decide on the minimal amount of RAM that is required to start the VM. The Maximum RAM setting is the upper limit of RAM that you will allocate to this VM. You cannot use this option to assign more RAM than is physically on the server. 64GB is still the upper limit for a virtual machine.
The Memory Buffer allows you to specify additional RAM above the current workload requirements. If it is available, your VM will have additional RAM to work with
The Memory Weight option allows you to establish a pecking order among your VMs to decide who gets additional RAM when the free pool of RAM is depleted.
The Memory Weight and Memory Buffer are the only two memory settings that can be adjusted while a VM is running. Changing between static and dynamic or adjusting dynamic memory requires the VM to be shut down.
The Hyper-V Manager also has some new columns added to it:

The Assigned Memory always starts at the Startup RAM value. The Memory Demand lets you know how much RAM is actually being used. The VM that is not reporting Memory Demand is configured for static memory.
You also need to install SP1 on your VMs to take fully advantage of Dynamic memory. Re-installing the integration services will also provide this functionality, but Microsoft recommends that you upgrade all VMs to SP1.
More information can be found by following this link to Microsoft.
Comments