To create a new virtual machine in Hyper-V, open the Hyper-V Manager.
In the Actions menu, click New \ Virtual Machine
In the Before You Begin window, click Next
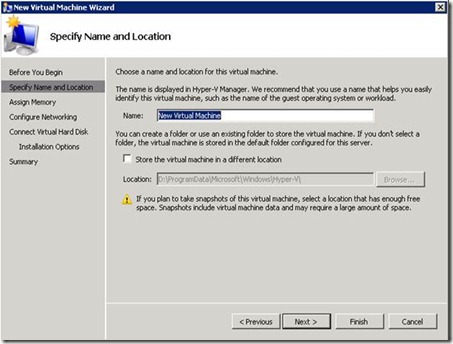
The default name is New Virtual Machine. It is a good idea to have some type of standardized naming context in your organization for the names of virtual machines. Enter the name of your virtual machine here.
The default location where the VM files will be stored is selected for you. It is a good idea to make sure you do not store VM files on the same hard drive as the host operating system or paging files. Check the box marked Store the virtual machine in a different location if you want to store it on a different drive.
Click Next
The Assign Memory window allows you to designate how much RAM your VM will use.
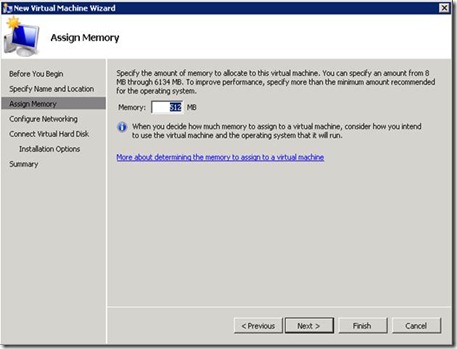
You can create a VM with 8MB to 64 GB of RAM. You cannot over allocate RAM. In other words you cannot give a VM 64 GB of RAM when the host server only has 32GB. You also need to leave undesignated RAM for the host operating system to use. This is not a permanent decision. If you later decide the VM needs more or less RAM, just shut the VM down and open the settings for that VM. There you can adjust the RAM. Bring the VM back online and it will be using the new RAM settings. You cannot adjust the RAM while the VM is running.
If you are running Windows Server 2008 R2 SP1, you will also have the option to use Dynamic Memory. With this configuration, you specify the start memory for the VM, and them how much memory the VM can dynamically access based on its needs. Your VMs need to have SP1 installed (or upgrade the integration services) for dynamic memory to function.
Click Next
The Configure Networking window lets you determine which virtual network this VM will be connected to.
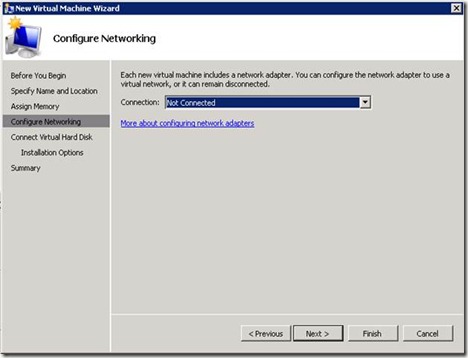
Be default, you will not be connected to any virtual network. That means this VM will not be able to communicate with any other VMs or physical computers. You can configure a virtual network using the Virtual Network Manager in the Hyper-V manager. Once you create one, it will appear in the drop down list. You can switch the VM from one virtual network to the other by opening its properties and changing the virtual network listed on the NIC. You can have multiple NICs and have the VM connected to multiple virtual networks. This can be done live without shutting down the VM.
Click Next.
The Connect Virtual Hard Disk window is next.
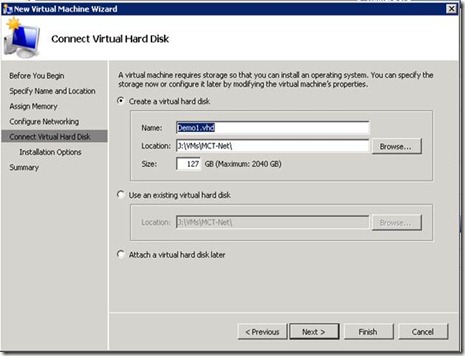
Here you can create a VHD file for you virtual machine. A VHD file is the hard drive of the virtual machine. This one in particular will be what the VM boots off of. You can add many more VHD files later. The default option is to create a fixed drive of 127 GB in size. Adjust this as needed. Also specify the location where this VHD file should be stored.
Your second option is to use a VHD file that has already been created for you. You can also skip this step and add a VHD file later. If you opt to add one later, the next step is skipped.
Click Next.
The Installation Options screen will help you install an operating system.
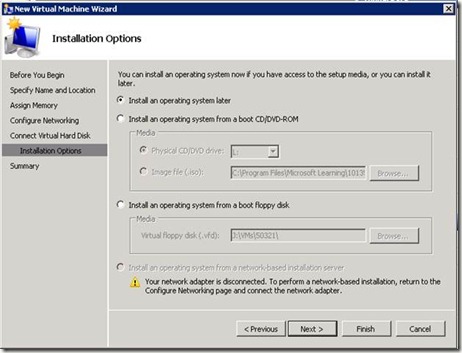
The default choice is to install an operating system later. If you boot this VM without an OS, you will get the same error messages as if you booted a physical computer without an OS.
You can install an OS from a CD/DVD drive on the Hyper-V server, or use an .iso file on a shared drive on the server. You can also select to use a virtual floppy disk (.vfd) file to install an OS.
Finally you can opt to install an OS from a network based system such as Windows Deployment Services.
Click Next.
At the Completing the New Virtual Machine Wizard page, click Finish.
In the Actions menu, click New \ Virtual Machine
In the Before You Begin window, click Next

The default name is New Virtual Machine. It is a good idea to have some type of standardized naming context in your organization for the names of virtual machines. Enter the name of your virtual machine here.
The default location where the VM files will be stored is selected for you. It is a good idea to make sure you do not store VM files on the same hard drive as the host operating system or paging files. Check the box marked Store the virtual machine in a different location if you want to store it on a different drive.
Click Next
The Assign Memory window allows you to designate how much RAM your VM will use.

You can create a VM with 8MB to 64 GB of RAM. You cannot over allocate RAM. In other words you cannot give a VM 64 GB of RAM when the host server only has 32GB. You also need to leave undesignated RAM for the host operating system to use. This is not a permanent decision. If you later decide the VM needs more or less RAM, just shut the VM down and open the settings for that VM. There you can adjust the RAM. Bring the VM back online and it will be using the new RAM settings. You cannot adjust the RAM while the VM is running.
If you are running Windows Server 2008 R2 SP1, you will also have the option to use Dynamic Memory. With this configuration, you specify the start memory for the VM, and them how much memory the VM can dynamically access based on its needs. Your VMs need to have SP1 installed (or upgrade the integration services) for dynamic memory to function.
Click Next
The Configure Networking window lets you determine which virtual network this VM will be connected to.

Be default, you will not be connected to any virtual network. That means this VM will not be able to communicate with any other VMs or physical computers. You can configure a virtual network using the Virtual Network Manager in the Hyper-V manager. Once you create one, it will appear in the drop down list. You can switch the VM from one virtual network to the other by opening its properties and changing the virtual network listed on the NIC. You can have multiple NICs and have the VM connected to multiple virtual networks. This can be done live without shutting down the VM.
Click Next.
The Connect Virtual Hard Disk window is next.

Here you can create a VHD file for you virtual machine. A VHD file is the hard drive of the virtual machine. This one in particular will be what the VM boots off of. You can add many more VHD files later. The default option is to create a fixed drive of 127 GB in size. Adjust this as needed. Also specify the location where this VHD file should be stored.
Your second option is to use a VHD file that has already been created for you. You can also skip this step and add a VHD file later. If you opt to add one later, the next step is skipped.
Click Next.
The Installation Options screen will help you install an operating system.

The default choice is to install an operating system later. If you boot this VM without an OS, you will get the same error messages as if you booted a physical computer without an OS.
You can install an OS from a CD/DVD drive on the Hyper-V server, or use an .iso file on a shared drive on the server. You can also select to use a virtual floppy disk (.vfd) file to install an OS.
Finally you can opt to install an OS from a network based system such as Windows Deployment Services.
Click Next.
At the Completing the New Virtual Machine Wizard page, click Finish.
Comments