
Use GPO Preferences to populate built–in groups on your clients.

If you need to populate users or domain group in the built-in groups on your clients, you have 2 choices.  You can use restricted groups.  The problem with restricted groups is that they will remove any existing members of that group and prevent you from adding anymore without using Group Policy.  Another option is to your GPO preferences.

Create a GPO to hold this GPO preference.

Edit the policy and expand Computer Configuration / Preferences / Control Panel Settings.

Click Local Users and Groups and then right mouse click it.

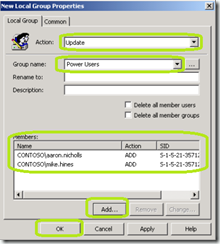
Select New –> Local Group


In the Action drop down list, ensure Update is selected.  The Update action will not remove the group if it already exists.  If it does not exist, the group will be created.

In the Group Name field, type the name of the group that you want to add members to.

Under Members, click Add.


Click OK when completed.
image

Apply this policy to the appropriate portion of Active Directory.

Refresh the GPO’s on your client and examine the local built-in group.  Your users should now be members of that group.
image

Comments

Calin said…
Very good information. If i remember well this works for Vista,7,2008 clients only which support this type og GPP.

Thanks.
Calin

Popular posts from this blog

With the AD Recycle Bin Turned on, What Happens when you Create a User Account with a Password that does not meet the Password Policy?

This was an interesting observation from one of my Windows Server 2012 classes.  While working with the AD Recycle bin in a lab, one of my students discovered some interesting accounts that were created. When he created user accounts that did not meet password complexity requirements, an account is temporarily made and then deleted.  When a new password is provided that meets the password requirements, then a new account is made. We discovered this in two places.  First off in the Active Directory Administrative Center.  This is what caused the initial confusion.  Take a look.  This is in the Deleted Objects OU. You can see multiple deleted accounts for Test2 and one for Test3.  Test3 is a valid, functioning user account.  Using the PowerShell command Get-ADObject –IncludeDeletedObjects –Filter * –Properties ObjectSID we can see that indeed, two accounts were created, with one of them deleted. Notice the RID portion of the SID is different. ...

Sticky Key problem between Windows Server 2012 and LogMeIn

This week I instructed my first class using Windows Server 2012 accessed via LogMeIn and discovered a Sticky Key problem every time you press the Shift key. Here is my solution to resolve this.  First off, in the Preferences of LogMeIn for the connection to the Windows Server, click General . Change the Keyboard and mouse priority to Host side user and click Apply at the bottom. On the Windows 2012 server, open the Control Panel – Ease of Access – Change how your keyboard works . Uncheck Turn on Sticky Keys . Click Set up Sticky Keys . Uncheck Turn on Sticky Keys when SHIFT is pressed five times . Click OK twice. If you are using Windows Server 2012 as a Hyper-V host, you will need to redo the Easy of Use settings on each guest operating system in order to avoid the Sticky Key Problem. Updated Information: March 20, 2013 If you continue to have problems, Uncheck Turn on Filter Keys .

How to run GPResult on a remote client with PowerShell

In the past, to run the GPResult command, you would need to either physically visit this client, have the user do it, or use and RDP connection.  In all cases, this will disrupt the user.  First, you need PowerShell remoting enabled on the target machine.  You can do this via Group Policy . Open PowerShell and type this command. Invoke-Command –ScriptBlock {GPResult /r} –ComputerName <ComputerName> Replace <ComputerName> with the name of the target.  Remember, the target needs to be online and accessible to you.