Split-Scope DHCP allows you to have a redundant DHCP system on your network. To achieve this in past implementations of Windows Server, we would allocate 80% of our address to one DHCP server and 20% to another. This was referred to as the 80/20 rule.
To begin, you need to have the DHCP role installed on the two servers that will participate in the split. On one server have the scope completely configured that you want to split.
Open the DHCP console.
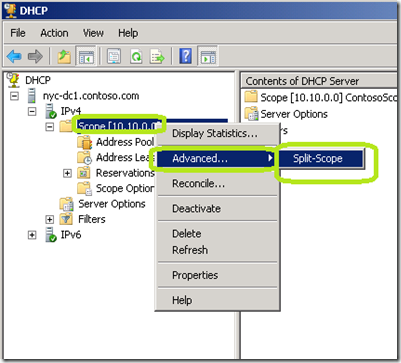
Right click the scope that you want to split and then click Advanced –> Split-Scope.
On the DHCP Split-Scope page, click Next.
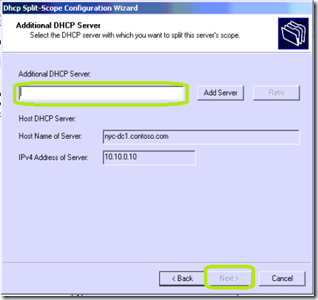
On the Additional DHCP Server window, enter the name of the second DHCP server and click Next.
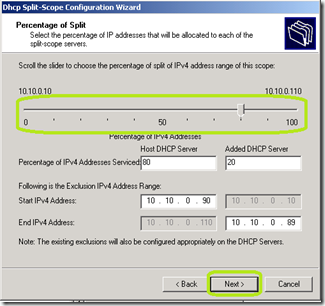
In the Percentage of Split screen, adjust the slider bar to set a percentage from the number of IP addresses that will be available on each server. Click Next to continue.
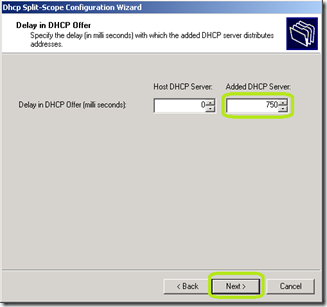
In the Delay in DHCP Offer screen, provide a response delay for the secondary server. This ensures that the primary DHCP has a chance to send an offer to the client before the secondary server springs into action.
At the Summary of Split-Scope Configuration screen, click Finish and then Close.
Log into the secondary DHCP server and open the DHCP console.
Select the scope. Right click the scope and click Activate.
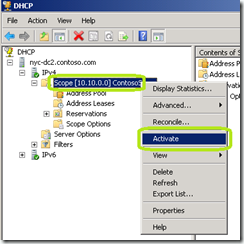
Your split scope DHCP is now configured and online.
By checking the properties of the secondary DHCP server’s scope, you will see the subnet delay that you configured in the Split Scope wizard.

To begin, you need to have the DHCP role installed on the two servers that will participate in the split. On one server have the scope completely configured that you want to split.
Open the DHCP console.
Right click the scope that you want to split and then click Advanced –> Split-Scope.

On the DHCP Split-Scope page, click Next.
On the Additional DHCP Server window, enter the name of the second DHCP server and click Next.

In the Percentage of Split screen, adjust the slider bar to set a percentage from the number of IP addresses that will be available on each server. Click Next to continue.

In the Delay in DHCP Offer screen, provide a response delay for the secondary server. This ensures that the primary DHCP has a chance to send an offer to the client before the secondary server springs into action.

At the Summary of Split-Scope Configuration screen, click Finish and then Close.
Log into the secondary DHCP server and open the DHCP console.
Select the scope. Right click the scope and click Activate.

Your split scope DHCP is now configured and online.
By checking the properties of the secondary DHCP server’s scope, you will see the subnet delay that you configured in the Split Scope wizard.

Comments