ImageX is a versatile tool that helps us work with Windows Image files (.wim). One of the neat things that you can do with ImageX is to mount an image file and then be able to copy and paste files and folders into it using Windows Explore. You can obtain a copy of ImageX when you download the Windows Automated Installation Kit (WAIK) and install the WAIK on your system. Once WAIK is installed and you have an image file to work with, follow this procedure.
First create a folder on your hard drive to mount the image in. For this demonstration, I created a folder called ImageMount on my D: drive.
Click Start \ All Programs \ Microsoft Windows AIK \ Windows PE Tools Command Prompt.
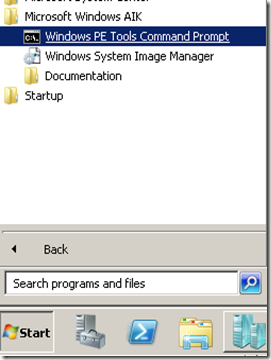
This will launch a special command prompt that is aware of the tools that were installed with the WAIK.
You will need to know the location where you stored an image file. Our image is stored at D:\Data.wim The folder we will be mounting this image in is D:\ImageMount. The folder that we mount the image in will act like the root of a hard drive so we can open it up just as if it was another hard drive on our system, and be able to browse the files and folders in it.
In the Windows PE Tools Command Prompt window, type Imagex /mountrw d:\data.wim 1 d:\ImageMount and press Enter. The number 1 is used for selecting which image in the .wim file to mount. .wim image files can contain more than one image. The image below shows what you should see.
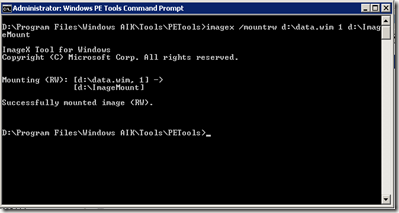
You can now open the ImageMount folder to see the contents of the image. Since we mounted the image using the /mountrw switch, we have read/write access to the image. If you only wanted to open the image with read access, use the /mount switch.
At this point you can add and remove files and folders from them image. A word of caution when deleting objects from the image. You cannot use the recycle bin to get them back. This is a non-reversible deletion. Once you are done, close Windows Explorer.
When the time comes to dismount the image so you can use it, follow this procedure:
In the Windows PE Tools Command Prompt windows type imagex /unmount /commit d:\ImageMount and press Enter.
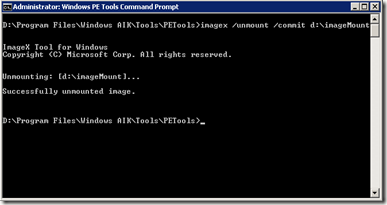
In the above command, if you omit the /commit switch, any changes that you made will be discarded and the .wim will retain its original state.
First create a folder on your hard drive to mount the image in. For this demonstration, I created a folder called ImageMount on my D: drive.
Click Start \ All Programs \ Microsoft Windows AIK \ Windows PE Tools Command Prompt.

This will launch a special command prompt that is aware of the tools that were installed with the WAIK.
You will need to know the location where you stored an image file. Our image is stored at D:\Data.wim The folder we will be mounting this image in is D:\ImageMount. The folder that we mount the image in will act like the root of a hard drive so we can open it up just as if it was another hard drive on our system, and be able to browse the files and folders in it.
In the Windows PE Tools Command Prompt window, type Imagex /mountrw d:\data.wim 1 d:\ImageMount and press Enter. The number 1 is used for selecting which image in the .wim file to mount. .wim image files can contain more than one image. The image below shows what you should see.

You can now open the ImageMount folder to see the contents of the image. Since we mounted the image using the /mountrw switch, we have read/write access to the image. If you only wanted to open the image with read access, use the /mount switch.
At this point you can add and remove files and folders from them image. A word of caution when deleting objects from the image. You cannot use the recycle bin to get them back. This is a non-reversible deletion. Once you are done, close Windows Explorer.
When the time comes to dismount the image so you can use it, follow this procedure:
In the Windows PE Tools Command Prompt windows type imagex /unmount /commit d:\ImageMount and press Enter.

In the above command, if you omit the /commit switch, any changes that you made will be discarded and the .wim will retain its original state.
Comments